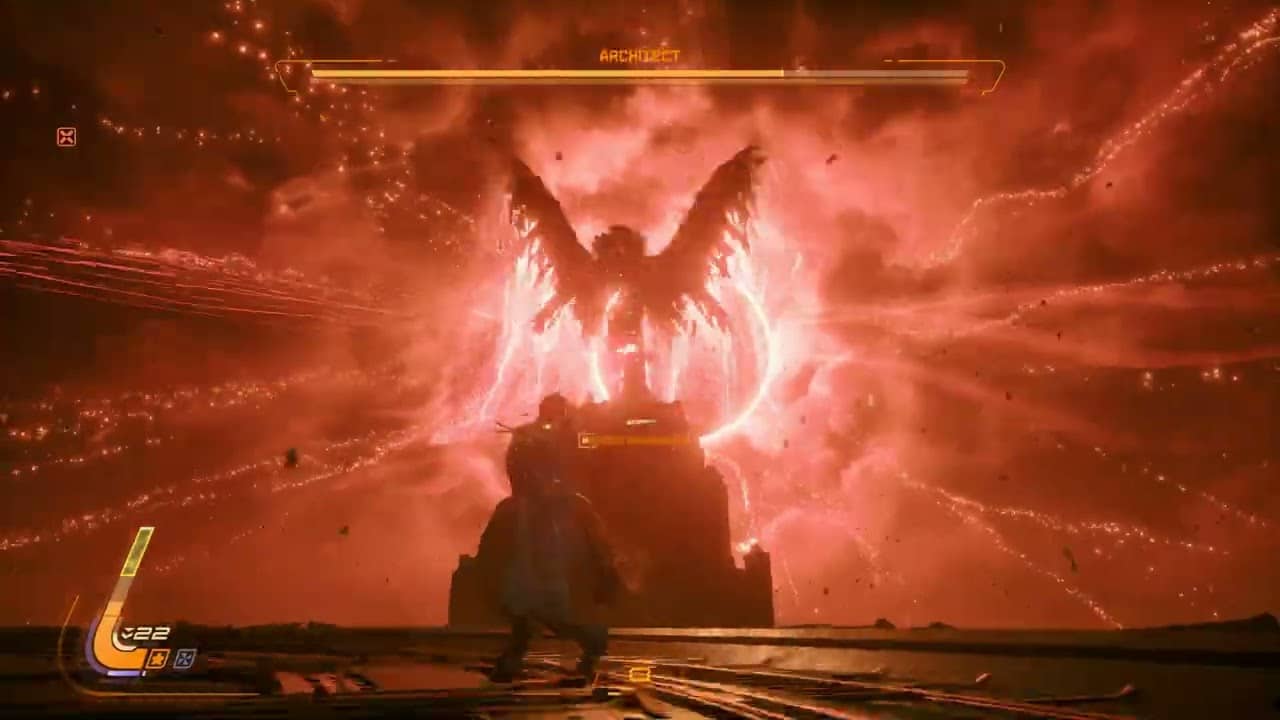
If you thought the marsh was tough, welcome to the Desecrated Fortress in Biome 5. This is where Saros stops holding your hand. The encounter with The Architect is a brutal test of spatial awareness and sustained DPS.
Captured in crisp 4K on the PS5 Pro, this gameplay archive is your blueprint for dismantling the Fortress’s greatest guardian. Here is how to survive the mechanical onslaught and come out on top.
The Architect Breakdown: Tactics for Success
The Architect isn’t just a boss; it’s the mastermind of the fortress’s defense systems. This fight is about precision movement and making every shot count against its shifting weak points.
1. Navigating the Orbital Barrage
The Architect’s primary defense is a constant stream of blue and red energy orbs that spiral outward in complex geometric patterns.
- The Pro Move: Do not panic-dash. The orbs move in predictable circular paths. In the official gameplay video, you’ll see the strategy is to maintain a mid-range distance, moving in a slow strafe to let the orbs pass by while keeping the crosshairs locked on the central red core.
2. Utilizing the Kinetic Shield
Your Kinetic Shield is the most important tool in this fight, especially when the fortress walls start closing in.
- The Strategy: When the boss charges its “Spread Shot,” deploy the shield and continue firing through it. This allows you to maintain pressure on The Architect’s health bar even when the screen is filled with projectiles.
3. Avoiding the Sweeping Solar Beam
Periodically, The Architect will focus its energy into a high-intensity red beam that sweeps across the floor of the Desecrated Fortress.
- The Strategy: This attack can’t be shielded effectively. Watch for the boss to stop its rotation; this is your cue to prepare for a vertical jump or a perfectly timed dodge-roll to bypass the beam’s hitbox.
Watch the Full Takedown
Witness the perfect balance of aggression and defense in Jason’s high-definition gameplay capture. Watching the movement patterns is the fastest way to learn the “gaps” in The Architect’s attack cycles.
Watch: Saros – Biome 5 The Architect Boss Fight Gameplay

Phase 2: The Aggression Ramp
Once The Architect’s health drops below the halfway mark, the fortress itself seems to turn against you.
- Homing Orbs: Look out for the purple-tinted orbs that track your movement. These require rapid, successive dashes to shake off.
- Environmental Hazards: The fortress walls will occasionally flare with energy, forcing you to stay toward the center—right in the line of fire. Use your mobility skills to “weave” between the incoming fire and the hazardous edges.
Victory Condition: After the final core collapse, the massive energy signatures of the fortress will stabilize, marking your successful conquest of Biome 5 and clearing the path forward.
Level Up Your Gameplay
Mastering Saros requires a mix of sharp reflexes and technical understanding. For more high-level boss guides, archival gameplay, and the latest updates on story-driven action titles, visit the Game Guides archive at jasonsvideogamessource.com.
Whether you’re playing on a standard console or pushing the limits on a PS5 Pro, keep your shields charged and your aim steady. See you in the next Biome.


![Assassin’s Creed Black Flag Resynched – Ego Welcome Onboot [Corrupted] Opening Animus EGO Cutscene](https://jasonsvideogamessource.com/wp-content/uploads/2026/07/maxresdefault-182-540x400.jpg)